DNS (Domain Name System) records control how your domain behaves - including where your website loads from, how email is delivered, and how services like verification and security work.
Within the Eclipse Portal, DNS is managed using Zone Manager.
Accessing Zone Manager
-
Log in to the Eclipse Portal
-
Navigate to Domains
-
Click Zone Manager
-
Locate your domain and select Manage
You will now see the full list of DNS records for that domain.
Understanding Common DNS Record Types
| Record Type | Purpose |
|---|---|
| A | Points a domain or subdomain to an IPv4 address |
| AAAA | Points a domain to an IPv6 address |
| CNAME | Alias of another domain |
| MX | Controls email delivery |
| TXT | Used for verification (SPF, DKIM, DMARC, Google, Microsoft, etc.) |
| SRV | Used for services such as VoIP or chat |
Adding a DNS Record

-
Inside Zone Manager, click Add Record
-
Choose the record type (A, CNAME, MX, TXT, etc.)
-
Fill in the required fields:
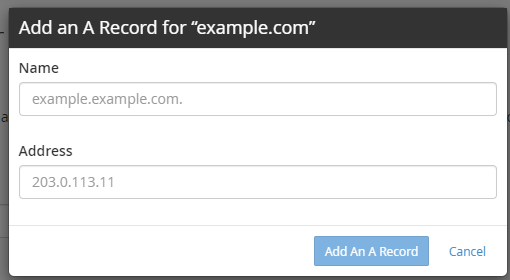
Example: Adding an A Record
-
Name:
www -
TTL:
300(default recommended) -
Address:
51.91.70.35
-
Click Save Record
✅ The record will be added immediately, but DNS propagation can take up to 24 hours.
Editing an Existing DNS Record

-
Find the record you want to modify
-
Click Edit
-
Update the value (IP, target, priority, or text)
-
Click Save
âš ï¸ Be cautious when editing MX, SPF, or DKIM records — incorrect changes may break email delivery.
Deleting a DNS Record
-
Locate the record in Zone Manager
-
Click Delete
-
Confirm the deletion
âš ï¸ Deleting required records (such as MX or A records) can cause:
-
Website downtime
-
Email failure
-
Verification issues
Managing Email-Related DNS Records
When managing email services, you will typically work with:
MX Records
-
Define where email is delivered
-
Priority matters (lower number = higher priority)
TXT Records (SPF / DKIM / DMARC)
-
Used for email authentication and spam protection
📌 Tip: Always keep existing email records unless specifically instructed to change them.
DNS Propagation & TTL
-
TTL (Time To Live) controls how long DNS is cached
-
Common values:
-
300(5 minutes) – temporary changes -
3600(1 hour) – standard -
7200+ – stable, long-term records
-
Changes usually apply within minutes, but global propagation can take up to 24 hours.
Best Practices
✔ Keep a backup of DNS records before making changes
✔ Avoid duplicate A or MX records
✔ Don’t mix email providers in MX records
✔ Allow time for DNS propagation
✔ Contact support if unsure before deleting records
When to Contact Support
You should contact support if:
-
Your website or email stops working after a DNS change
-
You’re unsure which records are required
-
You need help with third-party services (Microsoft 365, Google, VoIP, etc.)
Summary
Using the Eclipse Portal Zone Manager, you can:
-
Add new DNS records
-
Edit existing records
-
Safely delete unneeded entries
-
Control website, email, and service routing